Smart Contract Development
This tutorial is broken into two sections to help demonstrate an end-to-end workflow for interacting with smart contracts on the LAMINA1 network. If you either understand smart contract development, or are more interested in the Unity portion of the walkthrough, you may skip to the second part directly.
For the purposes of this documentation, we'll be using an ERC20 token contract to demonstrate contract interactions. This contract will allow:
- Creation of a new token with initial supply (assigned to contract creator)
- Transfer desired amount of tokens to another address
- Allow a token owner to burn their own tokens
- Query the token balance of a given wallet address
- Query the total supply of tokens
// SPDX-License-Identifier: MIT
// The above line specifies the contract's license type.

// Solidity compiler version
pragma solidity ^0.8.9;

// Import OpenZeppelin hosted contracts
import "@openzeppelin/contracts/token/ERC20/ERC20.sol";
import "@openzeppelin/contracts/token/ERC20/extensions/ERC20Burnable.sol";
import "@openzeppelin/contracts/access/Ownable.sol";

// Define the contract
contract CoolToken is ERC20, ERC20Burnable, Ownable {

    // Constructor called on contract creation
    constructor() ERC20("CoolToken", "COOL") {
        // Give entire initial supply to creator
        _mint(msg.sender, 100000 * 10 ** decimals());
    }

    // Mint some amount of tokens to a given address
    function mint(address to, uint256 amount) public onlyOwner {
        _mint(to, amount); // _mint is a function from the base ERC20 contract
    }
}
OpenZeppelin offers a wizard for generating contracts. It is advisable to use this wizard, and to utilize these standard contracts as they are both battle-tested and have been audited by the community.
You may notice that despite all the behaviors listed, it looks like we only have a constructor and a mint function. The remaining ERC20 functionality is being inherited from the OpenZeppelin contracts being imported which we will see when the contract is deployed.
Development Flow
Smart Contract Development
- Develop the smart contract code using Solidity
- Compile the smart contract code using the Solidity compiler
- Deploy the compiled contract to the LAMINA1 network
- Interact with the contract directly or via tools such as Remix
Unity Smart Contract Interaction
See part 2 for a detailed walkthrough of these steps.
- Retrieve the contract address, and Application Binary Interface (ABI) of the desired contract
- Generate C# class/classes based on the contract's ABI
- Utilize the L1 SDK to interact with the L1 network and the deployed contract
Compiling the Contract
Since we've already developed the contract code above, let's use the web-based Remix IDE to compile, deploy, and interact with it.
- Visit the Remix site.
- Click the File Explorer tab on the left-hand sidebar, right-click the 'contracts' folder provided for you and select 'New File'. Name the file 'CoolToken.sol' and paste the above contract code into the editor. You will receive an alert about pasting code into Remix, never do this with any code intended for production. Since this is an example, click 'Accept' and save the file.

- Select the Compiler tab on the left sidebar. A couple things to note:
The 'Solidity' version dropdown should be set to match the version specified in code as
pragma solidity ^[version];. In this case, we're using^0.8.9so we'll select0.8.9from the dropdown.When compiling, keep an eye on the 'Contract' dropdown as it changes to reflect the selected contract in the File Browser. Make sure this reads 'CoolToken.sol' before compiling.
Auto-compile will recompile anytime you save a contract in the workspace. You can either enable that option or click the 'Compile' button manually.

- The green checkmark on the Compiler icon means that the contract compiled successfully. A red X appears if errors are present, which will be displayed in the Compiler tab.
Deploying the Contract
Deployment Options
With a compiled contract in hand, the next logical step is for us to deploy it somewhere. Select Deploy & Run (underneath Compiler) on the left sidebar and review the elements of the interface:
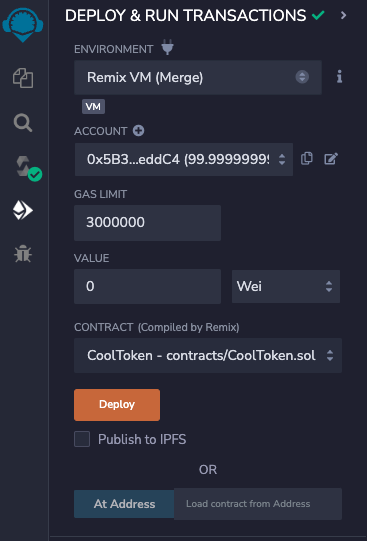
- Environment: This is the target system where your contract will deploy. There are various options, but leave 'Remix VM (Merge)' selected for now.
- Remix VMs: These are ephemeral virtual machines built into Remix, that are reset every time you refresh the page. They are useful for testing purposes before deploying elsewhere.
- Injected Provider: This is a browser-based extension injected into the site, usually MetaMask. This option allows you to deploy to any network you have configured in MetaMask, including the LAMINA1 Testnet that we'll address later.
- Dev Providers: Hardhat/Ganache/Foundry: These are locally hosted VMs you can download and run locally. If you have one running on your local machine, you can use this option to deploy to it.
- Account: This is the account that will be used to deploy the contract. Once an environment is selected, this dropdown will populate with available wallet accounts. The account selected here will be treated as the contract owner.
- Contract: The contract to be deployed. Make sure it shows CoolToken as the selected contract.
- 'At Address' Field: If you have already deployed this contract to the selected environment, you can enter the contract address here to interact with it.
- 'Deploy' Button: Once clicked, the deployment process is initiated. As soon as the transaction is confirmed (via MetaMask for example), the contract will be deployed. This is a permanent action.
Deploy to a Remix VM
- Remix VM is the default environment selected for contract deployment. Underneath 'Account', you will see several wallet addresses funded with 100 ETH each. Select one of these accounts to act as the contract owner, and copy its address using the copy icon. We'll use it later.
- Leave Gas Limit and Value alone, as they are not relevant for this example.
- Ensure that 'CoolToken' is selected as the contract to deploy. If not, return to the File Explorer tab and click CoolToken.sol to select it.
- Click the 'Deploy' button. Since we're using a Remix VM, the transaction will be confirmed immediately and the contract will be deployed.
- Once deployed, you will see an entry in the 'Deployed Contracts' section. Click the 'Copy' icon to copy the contract address. We'll use that later too. Expand the contract entry, and you are presented with all behaviors available within the contract including base ERC20 functions.
Contract Details (your addresses will vary)
- Contract owner wallet: 0x5B38Da6a701c568545dCfcB03FcB875f56beddC4
- Deployed contract address: 0xd8b934580fcE35a11B58C6D73aDeE468a2833fa8
- Token Name: CoolToken
- Token Symbol: COOL
Never use any wallet addresses in production provided by VMs in Remix or other testing environments. These are well-known addresses with publicly available private keys, meaning anyone can access the funds in them. Always use a wallet that you control the private key for.
Your contract is now deployed and ready to be used. Let's use the Remix interface to try out some operations.
LAMINA1 Testnet Deployment
Remix VMs are ephemeral (read: temporary), so deployment to a network such as the LAMINA1 Testnet is in order to make the contract permanent. Please see part 2 of this tutorial to demonstrate end-to-end usage of LAMINA1 via the Unity SDK.
Interacting with the Contract
In the Remix Deployed Contracts interface, Read operation buttons are blue, while Write operation buttons are orange. Let's try some of both.
Read Operations
Scroll down to the section of blue buttons at the bottom of the panel. You'll notice that most do not have input fields, and some do. Buttons with fields accept parameters, clicking the expand icon for that function will show fields for each.
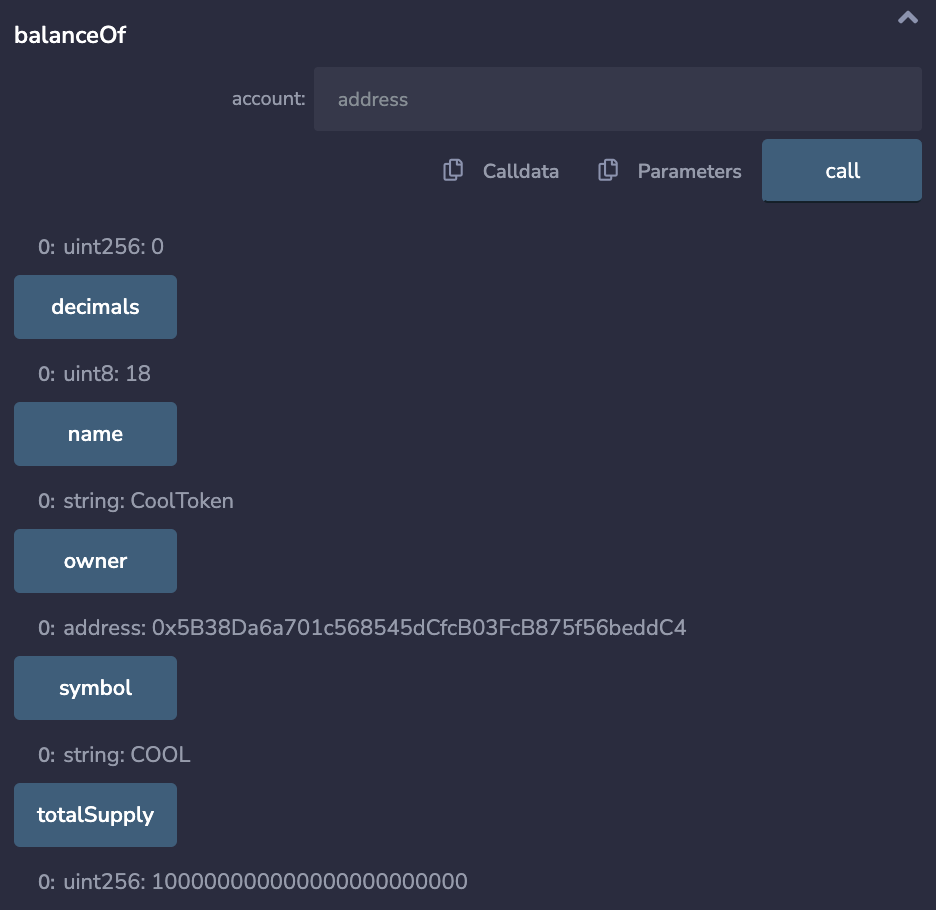
- Go ahead and press the totalSupply button, and you'll see the total supply of tokens in the contract. This is the value we set in the constructor.
- But where are those tokens? They went to the contract owner. To find out who that is, press the owner button. You'll see the address we used to deploy the contract.
- To verify that the owner has all the tokens, press the balanceOf button after entering the owner address. You'll see the total supply of tokens.
Note that to make these read calls, we can actually use any wallet address in the 'Account' field. This is because the contract is public, and anyone can read from it. This is not the case for write operations that specify restrictions on who can call them. Let's see that in action.
Write Operations
Restricted Behavior
function mint(address to, uint256 amount) public onlyOwner {
  _mint(to, amount);
}
Recall our mint function from earlier. It is restricted via the onlyOwner modifier, meaning only the contract owner can call it. Let's see what happens when I try sending myself 100 tokens as another account; Change the 'Account' dropdown to any other option, enter that address in the to field for the mint function and 100 for the amount. Then click the mint button.
transact to CoolToken.mint pending ...
transact to CoolToken.mint errored: VM error: revert.

revert
    The transaction has been reverted to the initial state.
Reason provided by the contract: "Ownable: caller is not the owner".
As the error says, only the contract owner can call mint. Change the 'Address' field back to that of the owner, and click the mint button again. This time, the transaction will succeed.
status                true Transaction mined and execution succeed
transaction hash      0x2055bc872907a189a0366524318cd6ba95737c1a688f3520731ec6510f43af65
from                  0x5B38Da6a701c568545dCfcB03FcB875f56beddC4
to                    CoolToken.mint(address,uint256) 0xd8b934580fcE35a11B58C6D73aDeE468a2833fa8
gas                   62187 gas
transaction cost      54075 gas
execution cost        32503 gas
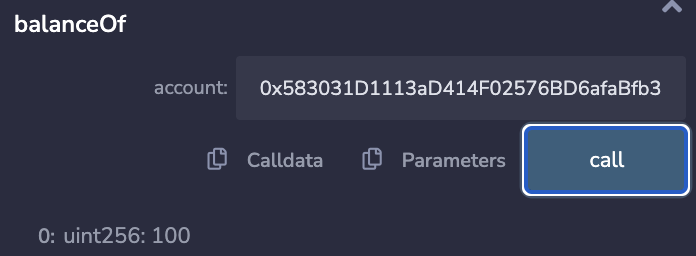
Entering the recipient wallet address into the balanceOf field and executing it will confirm that the transaction was successful.
Self-Learning Exercises
Burning Tokens
The burn function is used to burn tokens from the contract owner's wallet, reducing the total supply.
- Use the
burnwrite op to burn 1000 of the contract owner's tokens. Verify the change before and after withbalanceOfusing the contract owner's address.
Transfer vs. TransferFrom
These functions are used to transfer tokens from one wallet to another. The difference between the two is that transferFrom requires the sender to have approved the recipient to spend tokens on their behalf. This is useful for contracts that need to transfer tokens on behalf of a user.
- Try sending tokens from the current account to another with
transfer, and verifying withbalanceOf. - Try using
transferFrom, but specify some other account as thefromaddress. This should fail.
Allowances and Approvals
In this example, the allowance functions are available to approve a wallet to spend tokens on the owner's behalf. Try using these other functions to get a feel for how they work.
- Select the contract owner address in 'Account' field.
- Run
approvewrite op with a different address asspender, and 10000 asamount. - Run the
allowanceread op: Contract owner asowner, and the address from step 2 asspender. You should see 10000 as the result. - Run
decreaseAllowancewrite op with the address from step 2 asspender, and 5000 asamount. Verify withallowancethat the allowance has decreased by 5000.